¡Desconecta con la aplicación Player FM !
Preparing Your DS3 AED Cabinet
Manage episode 449380642 series 2597092
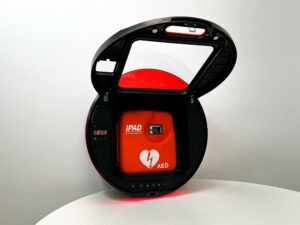
Guide to Preparing Your DS3 AED Cabinet
Welcome to our instructional guide on setting up your DS3 AED Cabinet. This tutorial will help you understand the installation process, customize the cabinet to fit your needs, and ensure that the AED is ready and functional for any emergency.
Initial Setup and Installation
Firstly, we’ll begin by mounting the back plate of your DS3 AED Cabinet. The back plate acts as the foundational support for the cabinet and should be securely attached to the mounting bracket. Once this is in place, the main cabinet unit will easily slot onto the back plate.
Customization Options
Preparing Your DS3 AED Cabinet also involves personalization. You can customize the graphics on the back plate to include your organization’s logo or any other details you wish to display. This customization ensures that your AED cabinet not only serves a functional purpose but also aligns with your branding.
Monitoring and Maintenance
The cabinet is equipped with an integrated light that indicates its status—green for active and ready, and red if there is a problem. Pay close attention to the internal temperature and humidity gauge, which is crucial for maintaining optimal conditions inside the cabinet. The built-in heating element helps regulate these conditions during colder months, while the insulation ensures the cabinet does not overheat during the summer.
Access and Security Features
The DS3 AED Cabinet features a secure locking mechanism. You can set it to allow unrestricted access by pressing the ‘Okay’ button or secure it with a code. Upon entering the correct code, the door will unlock, an alarm will sound, and the external light will turn red to indicate that the cabinet is open. When you close the door, the alarm stops, and the light will turn green, signalling that the cabinet is secure again.
Additional Functionalities
You can adjust settings such as the access code using the ‘Set’ button. The default code is ‘1234’, but it’s advisable to change this during your initial setup to enhance security. Regular checks and maintenance are essential; ensure that you frequently inspect the AED, checking its functionality and replacing any components as necessary.
Conclusion
Preparing Your DS3 AED Cabinet involves careful installation, customization for brand alignment, and regular maintenance to ensure readiness in emergencies. By following these steps, you can effectively enhance the safety measures in your facility, providing quick access to potentially lifesaving equipment.
The post Preparing Your DS3 AED Cabinet appeared first on The First Aid Show.
10 episodios
Todos los episodios
×Bienvenido a Player FM!
Player FM está escaneando la web en busca de podcasts de alta calidad para que los disfrutes en este momento. Es la mejor aplicación de podcast y funciona en Android, iPhone y la web. Regístrate para sincronizar suscripciones a través de dispositivos.


